

When choosing polarized fishing sunglasses, focus on four things: genuine polarization, UV400 ultraviolet protection, lens color and darkness for your water and weather, and how the frames fit your face. Brand name, mirror shine and trendy design come second. Below you’ll find what to check in the store, how to confirm polarization at home in a minute, and how much it makes sense to spend.
Key takeaways
- Polarization cuts glare off the water, while UV400 protects against ultraviolet light. They are two separate features, and you need to check both.
- Gray and brown lenses suit most conditions. Yellow and orange are for dawn, dusk and overcast days. Mirror coatings mostly make sense on big water.
- You can test polarization at home with a smartphone screen: rotate the lens 90° and the image should darken. UV protection can't be tested this way, so buy from a seller that accepts returns.
- A snug fit with wide arms blocks wind and side light. If you wear prescription lenses, there are prescription polarized lenses, clip-ons and over-glasses models.
- For a pond or river, an inexpensive pair with stated UV400 and genuine polarization is usually enough. Not everyone needs to pay extra for a brand.
Contents
What polarization does and what it can’t do
A polarizing filter blocks light reflected off the water. Surface glare disappears, which makes it easier to see fish, vegetation and the bottom contour, as noted in this fishingblog review. In practice, you spot a drop-off, a hole, a snag or a school of fry where an ordinary lens shows only a bright patch.
There are limits. Polarization removes glare but doesn’t make water clearer: in a murky pond you still won’t see the bottom. It helps most in bright sun, in shallows and in clear water. On a summer pond where the sun hits the surface from morning to evening, the difference is usually obvious right away. For seasonal tactics, see our article on summer crucian carp fishing.
Polarization and UV protection are two separate features. The first deals with glare, the second with ultraviolet light. A lens can have one without the other, so check both.
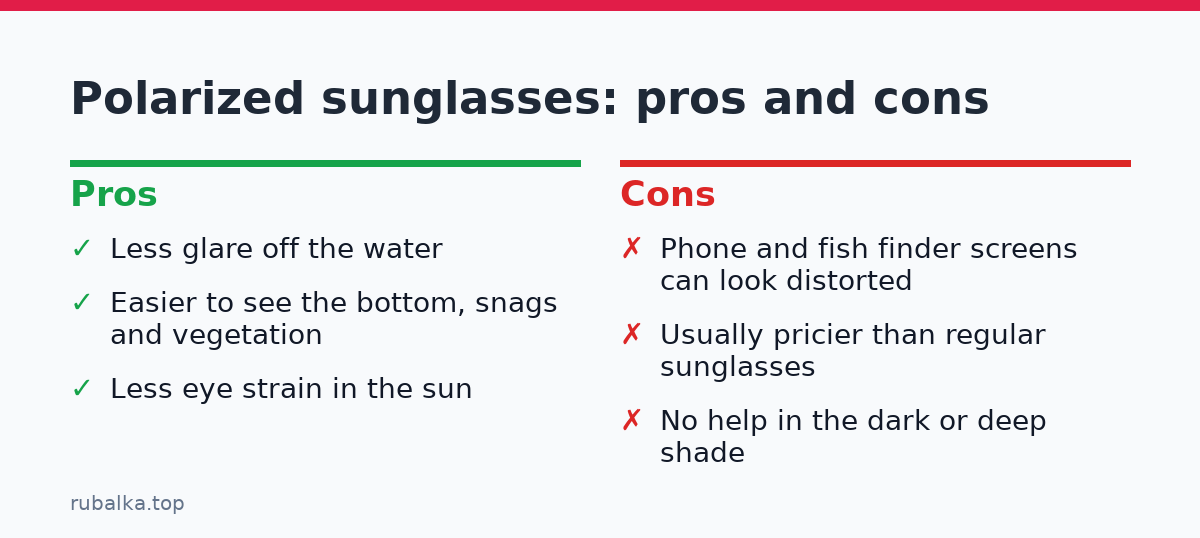
The downsides are real too. Polarized sunglasses can distort the image on digital screens, such as a smartphone or fish finder, and usually cost more than regular sunglasses. You don’t need them at night, and they do little in deep shade. Don’t believe claims like “will increase your catch by 30–40%” either: there is no verified data on that. Sunglasses help you see the water and tire your eyes less, but you’re the one who catches the fish.
How to choose lens color for polarized fishing sunglasses: water and weather
Lens color doesn’t replace polarization and UV protection, but it determines contrast, color rendering and comfort in specific light. Here are the main options side by side.

| Lens color | Works best in | Downsides |
|---|---|---|
| Gray | A range of lighting conditions, natural color rendering | Boost contrast less than yellow or orange |
| Brown, copper | Lakes and ponds in daylight; often recommended for lakes | Slightly alter color perception |
| Yellow, amber | Dawn, dusk, fog, overcast weather: raise contrast in low light | Can distort colors, not suited to bright sun |
| Orange | Same conditions as yellow: low light, overcast | Color distortion, unnecessary in bright sun |
| Blue | Often a tint with a mirror coating; these lenses are designed for bright light on big water | The color alone doesn’t guarantee a mirror coating or higher protection, so check the coating and tint level in the description |
Bright sun and open water
For midday and an open shoreline you need a darker lens. The simplest choice is gray: it doesn’t change colors and works in varied light. Brown or copper lenses are a popular pick for lakes.
A mirror coating reflects some of the light and reduces brightness, so it’s recommended for the sea and large lakes. At certain angles, though, it can distort the picture, and scratches on it are visible and hurt performance. On a small pond or river, a mirror coating is usually unnecessary.
Among gray options with stated UV400, the store carries polarized Rapala TR90 sunglasses: their description lists UV400 protection, reduced glare from water and a lightweight TR90 frame.
Dawn, dusk, fog and overcast days
When there’s little light, a dark gray lens cuts out too much. At those hours, yellow and orange lenses raise contrast and help you make out detail. The price is distorted colors, and once the sun is up and bright, those lenses no longer work.
The practical solution is two pairs: a versatile gray or brown for the day, and a lighter orange or yellow for morning, evening and fog. This is especially noticeable in autumn, when days are short and the sun is low. We covered these conditions in our piece on autumn pike fishing with a spinning rod.
If you want to compare colors in practice, there’s a series of polarized sunglasses for anglers and drivers with black, blue and orange options. Orange makes sense as a second pair for low light.
River, pond or lake
Brown and copper lenses work well on a lake. On a river or small pond the light keeps changing: the bank, trees, clouds, shadows from the reeds. So a versatile gray or brown is handier here than a brightly tinted lens. This is selection logic, not lab data: the final word belongs to your eyes and your typical water.
UV400, lens material and markings
Sunglasses should block 100% of UVA and UVB. On the tag or packaging this is usually marked as UV400. Buying without UV protection is called one of the main selection mistakes, and that makes sense: you spend many hours in a row on the water.
A dark lens doesn’t mean UV protection. Dark tint without a UV filter is worse than a light lens with one, because your pupil opens wider and lets in more light, while the ultraviolet doesn’t go anywhere.
You can’t check UV protection at home: the screen test confirms only polarization. So look at other things: the UV400 or “100% UVA/UVB” mark in the description and on the tag, the standard for sunglasses (ISO 12312-1), the filter category that shows the degree of darkening, and the warranty and return terms. All of this is the manufacturer’s claim, so buy where you can exchange the item, and keep your receipt.
Another specification is visible light transmission (VLT) as a percentage: the lower it is, the darker the lens. Not every seller lists it. In that case, go by tint density: the lens should be light for morning and darker for midday.
Lens material affects weight, optics and durability. The general tendencies are:
- Glass usually has better optics and scratch resistance, but it’s heavier and can shatter.
- Polycarbonate is lighter and more impact-resistant, but it scratches faster.
- Nylon, Trivex turn up in pricier models; check the manufacturer’s description for exact properties.
These are guidelines, not a guarantee for every model. For fishing, lightweight polycarbonate usually makes more sense: the glasses also shield your eyes if a hook or sinker comes loose during a cast. Coatings matter too: mirror and anti-glare coatings work only until they’re scratched, so don’t keep your glasses lens-down in a pocket or backpack without a case.
Fit, frames, prescriptions and screens
Sunglasses with a snug fit and wide arms protect your eyes from wind and spray. For that to work, the frame has to suit your face: it shouldn’t press on the bridge of your nose or behind your ears, or slide down when you lean toward the water. Before buying, tilt your head down and turn it sharply to the side. If the glasses shift, they’ll annoy you every minute on the bank.
Light reaches your eyes not only through the lens but also from above. That’s why a cap with a brim pairs well with sunglasses: it blocks some of the light from above and from the sides. For example, a fishing hat with a brim and neck protection is designed for long hours in the sun and has an adjustable fit of 54–60 cm (21–23.5 in).
If you wear prescription lenses
There are three options, and each involves trade-offs:
- Prescription polarized lenses are ordered from an optician to your prescription. They’re convenient if you need the glasses every day, but they cost more.
- Clip-ons attach to your regular frames. They’re cheaper, but you need frames that hold them, and they’re one more piece that’s easy to lose.
- Over-glasses models are the simplest way, but they can be bulky. Try them on together with your own glasses.
Screens, shade and night
Smartphone and fish finder screens can darken or distort through polarized lenses. Turning the phone or your head 90° often helps, but it’s better to test this before buying, not in the boat. For help choosing the device itself, read our article on how to choose a fish finder.
Take your smartphone and fish finder, or a photo of it on a screen, to the store. Look at the screen with your head in several positions: if it’s hard to read, choose different lenses or wear the glasses on your forehead when you need to see the screen.
In deep shade, toward evening and at night, dark lenses are worse than no lenses: you see the rod tip, the knot and the hook less well. Keep a light pair in your backpack or take the glasses off when there isn’t enough light.
Your fishing style matters too. When spinning, you’re constantly scanning the bank, the depths and the weed edges, while with a feeder you mostly sit in place and watch the rod tip. In the first case glare bothers you more, in the second comfort of fit comes first. For the differences between the two approaches, see “Spinning vs. Feeder”.
How to test polarization at home: step by step
These tests confirm polarization only, not UV protection. Run them on your own phone or laptop screen rather than relying only on the seller’s word.
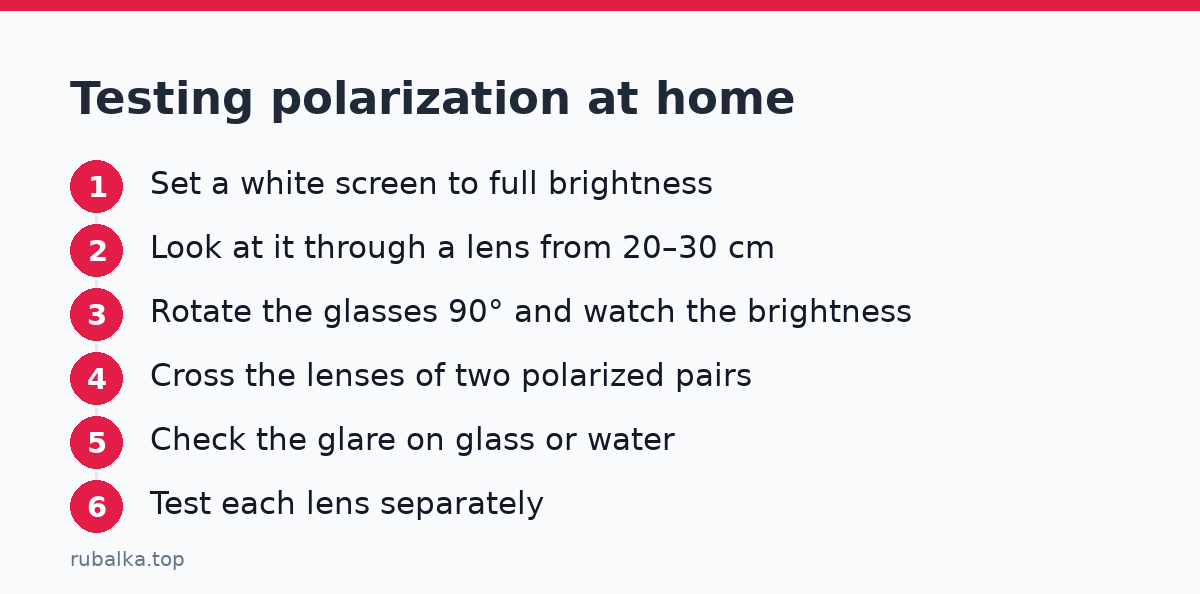
- Turn your smartphone, laptop or monitor to full brightness and open something with a white background.
- Look at the screen through one lens from 20–30 cm (8–12 in).
- Slowly rotate the glasses 90° (or tilt your head sideways). With a polarized lens, the screen noticeably darkens at some position; with an ordinary one, the brightness doesn’t change.
- If there’s no effect, try another screen: not all displays react the same way. For a second test, cross the lenses of two pairs of polarized glasses: where they overlap, the image should go dark.
- The third test is glare. Look at wet tile, glass, a window or water in a basin and rotate the glasses: the glare should vanish or weaken significantly.
- Check both lenses separately. If the effect appears in only one, it’s defective.
The most reliable test is what you see on the water. A smooth, wet surface with a sun glare shows within seconds whether the lens really cuts reflected light.
Budget: what to pay for and what not to
Prices depend on brand, material, coatings and warranty, so exact price ranges go out of date quickly. The best guide is how well a pair meets the points above, not the number on the price tag.
- Entry level. Simple polarized sunglasses with stated UV400 for the pond, the river and day trips. For most amateurs this is enough; the key is genuine polarization, UV protection and a good fit.
- Mid-range. A better frame, neater coatings, several lens colors for different light, a clear warranty. It makes sense if you fish every week and the conditions change.
- Premium. Well-known brands such as Costa, Maui Jim or Oakley, often with special lens materials and coatings. This is appropriate for frequent fishing on big water; for a beginner on a pond, such a premium is usually unnecessary.
To compare, browse the models in the store’s “Fishing sunglasses” section: the product cards list lens color, whether the lenses are polarized, and the current price.
The most common mistakes:
- buying for design and color without checking UV400;
- assuming a dark lens means UV protection;
- taking the darkest pair and fishing in it at dawn;
- buying mirror lenses for a pond where they aren’t needed;
- not trying the fit and not checking screens;
- expecting one pair to suit all conditions.
Before you pay, do four things: confirm UV400 in the description, test polarization on a screen, choose a color for your typical conditions, and try on the fit. If you’re unsure about anything, take a versatile gray or brown pair and add an orange one later for dawn and overcast days.
FAQ
Do you need polarized sunglasses for fishing?
They're not required, but they're handy wherever there's a lot of glare on the water: they make it easier to see the bottom, vegetation and fish. You don't need them at night, and they're of little use in deep shade. Sunglasses don't guarantee a catch; they only improve visibility and reduce eye strain.
What lens color is best for polarized fishing sunglasses?
The all-round choice in bright light is gray lenses, and on a lake brown or copper are often recommended. At dawn, dusk, in fog and in overcast weather, yellow and orange lenses work better. A mirror coating mostly makes sense on large bodies of water.
How can I tell if sunglasses are really polarized?
Look at a phone or monitor screen through the lens and rotate the glasses 90°: the screen should darken. You can also cross the lenses of two polarized pairs or look at glare on water or glass. Check both lenses, and remember that this test doesn't show UV protection.
Can you see a phone or fish finder screen through polarized sunglasses?
Sometimes the screen darkens or distorts, especially at a certain angle. Turning the phone or your head often helps. Test this on your own device before you buy.
Can you fish in polarized sunglasses with a prescription?
Yes. You can order prescription polarized lenses from an optician, buy clip-ons for your own frames, or get glasses that fit over your regular ones. Try the option on together with your own glasses to judge comfort and field of view.

Leave a Comment
Your email address will not be published. Required fields are marked *